| Q u i c k C o l o u r P i c k e r v 2 . 0 | Chapter 4-B |
Internal Selection Tools are what you will be using when you select colours from within the program itself. The internal selection tools consist of your mouse pointer and a sophisticated set of colour palettes located at the top of the window.
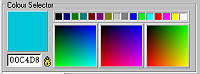
To select a colour from the colour palettes just point and click. When you move your mouse over the palettes you will notice that a panel at the left side of the screen changes colour rapidly. This is the "Colour Preview" pannel. This viewer gives you a larger view of the colour directly under your mouse. If you click anywhere on the palette panels (or even on the preview panel) the colour directly under your mouse will be chosen and sent to the "Colour Viewer". Its "primary" colour values will instantly be displayed in both hexadecimal and decimal next to the slide-bars and a full hexadecimal representation of the colour will be sent to the RGB values panel. This is where you can copy the values to the windows clipboard (more on this later). You can change the palette style by right clicking on one of the large palette panels. This will give you instant access to activating the Websafe palette. Another way to chose colours internally is to use a standard Windows colour dialogue box. This can be used by selecting the icon that looks like a painter's palette in the upright rectangular panel between the "RGB Values" window and the "Colour List". With this method you chose your colour using the familiar Windows dialogue and select OK. Your colour will then be selected and you will see all of the numbers and adjustments change to match its values. If you have added colours to the custom palette areas in the Windows palette dialogue Quick Colour Picker will ask you if you would like to add them to the Colour List. If you do, the custom areas in the window will be cleared and your custom colours will be added to the Colour List Box.
You will notice that between the Colour Preview panel and the first colour palette there is a small icon of an old padlock. When you first start Quick Colour Picker this lock is in the locked position. To unlock it just click it with your left mouse button. Now each time you click a colour you will notice the palettes change. The palettes use the colour you pick as a base colour to generate a new palette of colours for you to choose from. Clicking on the lock again will lock those palettes into their current state so that you can choose colours from them without them changing again. To reset the palettes back to their default state just right click on the lock.
 External selection tools are tools designed to allow you to pick colours from
outside Quick Colour Picker's boundaries. You will find these tools in the
upright tool panel next to the "Colour List" Panel. These tools are for
capturing a picture of the desktop, capturing a picture from the windows
clipboard, and for retrieving stored colour lists from your disk drive.
External selection tools are tools designed to allow you to pick colours from
outside Quick Colour Picker's boundaries. You will find these tools in the
upright tool panel next to the "Colour List" Panel. These tools are for
capturing a picture of the desktop, capturing a picture from the windows
clipboard, and for retrieving stored colour lists from your disk drive.
The Desktop Capture icon looks like a 35mm SLR camera. This icon snaps a picture of your desktop with all of your programs running and then allows you to chose the colour from the captured image. When this icon is left clicked you will see the program minimize and disappear. Don't be alarmed! Quick Colour Picker hides itself to allow you to get a clear picture. There will be a slight delay, to ensure that the Windows screen is refreshed, and then Quick Colour Picker jumps back onto the screen with the picture. Now all you have to do is scroll around the picture's window, find the colour you want, and click it with the left mouse button.
If you right click the desktop capture button, it will toggle on and off the Active Pixel Colour Capture. This allows you to capture colours from any pixel your mouse happens to be hovering over while working outside of the colour picker program. Just press the ALT+F8 keys and, the colour directly under your mouse, is selected and (if the "Auto Copy" option is checked) copied to the clipboard so that you can insert it immediately into your HTML documents. If you find that a program prevents you from using the ALT+F8 keys, as a result of having a function assigned to them, you can change the hotkey assignment by left clicking the "Active Pixel Capture" icon. This usually remedies the situation.
$$The "Colour Preview" pannel has a "Zoom" feature which gives you a close up view of your desktop when using the "Active Pixel Capture". To use it, Right click the panel.
Quick Colour Picker is capable of capturing colours from your favorite photos through using the windows clipboard. All you need to do is use your favorite bitmap editor and its copy to clipboard function. Quick Colour Picker has an icon that looks like a clipboard with a small arrow pointing outward from it. When you click this icon Quick Colour Picker will attempt to retrieve any bitmapped image that was copied to the Windows clipboard and will display it for you to pick colours from. Just scroll around the window, that appears with the picture in it, and click on any spot to claim its colour for your own.
Quick Colour Picker allows you to retrieve colours that have been stored on disk. This is a very powerful tool for web designers and graphic artists. The file name extension used for Quick Colour Picker is CDT short for Colour DaTa. Quick Colour Picker is also able to retrieve data from Match Head⌐ list files (LST) (A freeware program written by Daniel Lewis) and $$Adobe color swatch files (.ACO). The format of the CDT files is very readable with a text editor, but it is not recommended for you to edit these files yourself. The files can also be loaded by dragging the file on top of Quick Colour Picker. If you would like, you may also set up a file association in Windows that will start up Quick Colour Picker each time you double click a CDT file (Please consult your Windows Documentation for associating files). To specify a default file to be opened every time Quick Colour Picker is started just alter the properties of the program's icon to include the path and name of the file to be opened.
Example:
"C:\Program Files\Commercial\Web Utilities\Quick Colour Picker v2-0\Quick Colour Picker v2-0.exe" D:\MYDOCU~1\QUICKC~1\LAUREN~1.CDT
$$Quick Colour Picker also has an option to load the last loaded file automatically on its startup. This can be set by right clicking the Load icon.
To port colours to Adobe it is best to use the save as "Adobe Colour Swatch" (.aco) OR "Adobe Colour Table" options. You will need to load the file into Adobe's colour swatch.
If you want to extract colours from a picture in Adobe photoshop, copy the image to the clipboard first then use the "Get image from clipboard" option.
| < Previous | 5 | Next > |